Crocheted Pullover Sweater
 The pullover and cardigan sweater instructions assume you have an intermediate
knowledge of crochet or knitting. This means you know how to work to gauge, increase,
decrease, match pieces, and sew pieces together.
If you have this background, it is not difficult to design your own pullover
sweater to fit the way you want. You will need
an old sweater that fits you the way you want, a stitch you like,
yarn you like that works with the stitch,
and a little know-how
The pullover and cardigan sweater instructions assume you have an intermediate
knowledge of crochet or knitting. This means you know how to work to gauge, increase,
decrease, match pieces, and sew pieces together.
If you have this background, it is not difficult to design your own pullover
sweater to fit the way you want. You will need
an old sweater that fits you the way you want, a stitch you like,
yarn you like that works with the stitch,
and a little know-how
Old Sweater That Fits
Find a pullover that fits you the way you want the new pullover to fit. You will use this pullover to get the lengths and widths of the four sweater pieces: front, back, right sleeve, and left sleeve.
While you are at it, note the stitch used and the weight and type of yarn. You do not have to use the exact same stitch and yarn, but this information will inform your stitch and yarn decisions for the new sweater especially if you want a similar look and fit.
Measure the lengths and widths of the front, back, and sleeves, and record this information somewhere. If you want the new sweater to be a little tighter, looser, or longer than the old sweater in any of the pieces, you can account for that when you spec out the new sweater.
Note: The first time you make a sweater this way, consider following the old sweater as closely as possible except for minor tweaks to the length or width of the sleeves or body pieces.
Stitch You Like
Browse the web and/or stitch books to find a few stitches you like. If this is your first sweater, you might want to go with something simple rather than a pattern because with patterns you have to figure in how the pattern can evenly repeat within the required width, and how the sides are to join when you sew them together. For example a pattern that alternates between 5 double crochets and shells should probably end with the double croshets at each end to make it easier to sew the sides together evenly.
Yarn You Like
Browse the web and/or yarn stores to find a yarn you like. The yarn, stitch, and hook or needle need to work together for the overall sweater effect you want to achieve. My best recommendation is that you keep the stitches you are considering in mind when choosing the yarn. Once you choose and purchase the yarn, try making a 5 inch by 5 inch square of the yarn and stitch using different size hooks or needles until you like the result.
Note: If you choose a much heavier or lighter yarn than the old sweater or use a larger or smaller stitch, the final new sweater's look and fit will be somewhat different as a result.
Know-How
Once you settle on the stitch, yarn, and hook or needle size, you are ready to get started.
Measurements
Decide if you want your new sweater to have the same dimensions as the old one. If you do, you can work from the original dimensions you recorded from the old sweater. If you want the new sweater a little larger or smaller, add or subtract where necessary. That is, if your original sweater reaches your mid-thigh and you want one that stops at your waist, subtract the appropriate number of inches from the front and back sweater pieces. Don't forget to include the finishing in your calculations for the final front, back, or sleeve lengths.
Note: Depending on how you join the pieces, you might want take into account the seams and how they might shorten the desired width.
Back
I like to start with the back so that any glitches I run into where I don't want to start over will be in the back.
Take the square that uses the stitch, yarn, and hook or needle you decided on and figure out your gauge. Using the gauge, figure out how many stitches you need to reach your desired width for the back piece of the sweater. Chain the appropriate number of chains, turn, and work your stitch across. As you make the rows, measure to be sure you will end up with the desired width.
![]() Note: If you are combining stitches into a pattern, take into account
how the pattern will repeat and how you want the sides. I did one like this that
consisted of a repeating pattern of 3 double crochets and shells. I designed it
so the sides of the back, front, and sleeves started and ended with the 3
double crochet stitches so it would look even and sew together nicely.
Working out the width was a little tricky to make it come out right, and
I settled for a width that was slightly less than I had wanted but would
still work.
Note: If you are combining stitches into a pattern, take into account
how the pattern will repeat and how you want the sides. I did one like this that
consisted of a repeating pattern of 3 double crochets and shells. I designed it
so the sides of the back, front, and sleeves started and ended with the 3
double crochet stitches so it would look even and sew together nicely.
Working out the width was a little tricky to make it come out right, and
I settled for a width that was slightly less than I had wanted but would
still work.
Drop Shoulders
If the sweater you are matching has drop shoulders, you do not have to adjust the shape of the sweater back for the sleeves. Just keep making rows until you reach the bottom-most row of the back neckline curve. You want to end up with a square or rectangle with a neckline curve.
Contoured Armholes
 If the sweater you are matching has contoured
armholes you do have to decrease accordingly. Make row after
row until you reach the bottom of the armhole. At this point, decrease
and keep decreasing at each row until you have a properly contoured
armhole. Continue without decreasing until you reach the row that matches
the bottom-most row of the back neckline curve. Keep track of the number
of rows and your method of decreasing so you can match the contoured
sleeve to the hole later.
If the sweater you are matching has contoured
armholes you do have to decrease accordingly. Make row after
row until you reach the bottom of the armhole. At this point, decrease
and keep decreasing at each row until you have a properly contoured
armhole. Continue without decreasing until you reach the row that matches
the bottom-most row of the back neckline curve. Keep track of the number
of rows and your method of decreasing so you can match the contoured
sleeve to the hole later.
Back Neckline Curve
Make row after row while watching your gauge until you reach the row that matches the bottom-most row of the back neckline curve. However, if you sweater does not curve at the back, keep making rows until you reach your desired length.
To do the back neckline curve, work a row in until you reach the next point in the neckline curve. Turn to go back, but decrease as needed to match the shape of the back neckline curve on the old sweater. Keep doing this until you match one side of the back neckline curve and the desired length of the sweater. Tie off and do the same thing on the other side so that you have a back piece that matches the size and shape of your old sweater taking into account any adjustments you made for the length or width.
Front
 Do the front the same way you did the back piece. Most sweaters have
a deeper neckline curve in the front so make sure you match it to your
old sweater correctly.
Even if you don't quite get it exactly right or decide you want it
different when you assemble it and try it on, you can compensate for a
too-wide neckline as long as it's not too far off when you do the finishing.
Just make sure you don't make the neckline too small. It has to be wide
enough to fit your head through (of course).
Do the front the same way you did the back piece. Most sweaters have
a deeper neckline curve in the front so make sure you match it to your
old sweater correctly.
Even if you don't quite get it exactly right or decide you want it
different when you assemble it and try it on, you can compensate for a
too-wide neckline as long as it's not too far off when you do the finishing.
Just make sure you don't make the neckline too small. It has to be wide
enough to fit your head through (of course).
Note: You can make the front and back neckline curves the same. Then, there is really no difference between the front and back of the sweater in terms of the shape.
Sleeves
The shape and size of the sleeves depend on whether the sweater has drop shoulders or contoured armholes.
Drop Shoulders
 With drop shoulders, all you have to do to make the sleeves is decide
how wide you need the piece to be and make a rectangle of the desired
width and length to fit your arm without the cuffs. If the original sweater
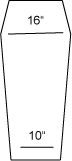
measures 8 inches from shoulder to armpit, make a piece that is 16 inches
wide with as many rows as you need to reach the needed length.
With drop shoulders, all you have to do to make the sleeves is decide
how wide you need the piece to be and make a rectangle of the desired
width and length to fit your arm without the cuffs. If the original sweater
measures 8 inches from shoulder to armpit, make a piece that is 16 inches
wide with as many rows as you need to reach the needed length.
Contoured Armholes
 For contoured armholes, you have to match the decreasing you did on the
back and front for the armholes, but increase instead. Refer to your notes
regarding how many rows you decreased and when, and make the sleeves the exact
reverse of that.
For contoured armholes, you have to match the decreasing you did on the
back and front for the armholes, but increase instead. Refer to your notes
regarding how many rows you decreased and when, and make the sleeves the exact
reverse of that.
Tapered Cuffs
Consider if you want the sleeve to taper a little from the forearm to the cuff holes. If so, decrease every 3 or 4 rows or so to make the sleeve gradually narrow. You can do more tapering when you add the cuffs.
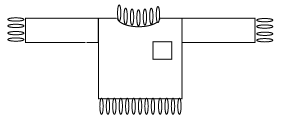
Assembly
- Sew the front and back shoulder seams together
- Sew the font and back sides together leaving the right amount of space to fit the sleeves into the armholes
- Sew the sides of the sleeves together
- Sew the sleeves into the armholes
- Try it on
Finishing
 Apply a single crochet around the sleeve cuff holes, the neckline,
and the bottom hemline. Choose a finishing stitch such as ribbing,
double crochet, or shells and this and apply it to the cuffs, neckline,
and bottom hemline in as many rows as you need to achieve the desired
length and fit. If your new neckline is too loose,
make an extra few rows or skip a stitch or two at the shoulder seams.
Apply a single crochet around the sleeve cuff holes, the neckline,
and the bottom hemline. Choose a finishing stitch such as ribbing,
double crochet, or shells and this and apply it to the cuffs, neckline,
and bottom hemline in as many rows as you need to achieve the desired
length and fit. If your new neckline is too loose,
make an extra few rows or skip a stitch or two at the shoulder seams.
Note that it is a good idea to be somewhat consistent in the finishing length. That is, you might want to match the cuff and bottom hemline finishing in terms of the number of rows, but leave the neckline either thinner or longer depending on the effect you want. Adding more rows to the neckline can give you a mock turtleneck or turtleneck effect.
Tapered Cuffs and Bottom Hemline
 Some sweaters have tapered sleeves and/or bottom hemline. You can taper the
cuff by adding two or three rows of single crochet on top of the first row
when you started the finishing. In each of the subsequent rows of single crochet,
make 4 or 5 single crochets and then skip a stitch. Work it out by counting
the number of single crochets in the first row so that you skip stitches
evenly all the way around.
Some sweaters have tapered sleeves and/or bottom hemline. You can taper the
cuff by adding two or three rows of single crochet on top of the first row
when you started the finishing. In each of the subsequent rows of single crochet,
make 4 or 5 single crochets and then skip a stitch. Work it out by counting
the number of single crochets in the first row so that you skip stitches
evenly all the way around.
Ribbing
In crochet, there are two ways of making ribbed stitches that work well for finishing. One way is with front and back post double crochets, and the other is with single crochets.
Pockets
To add a pocket to the sweater make a square or rectangle in the size you want and that works with the overall design and size of the sweater. Use the same stitch you used for the sweater and sew the bottom and sides of the square or rectangle onto the sweater where you want the pocket(s). Be sure to line up the pattern so the pocket blends into the sweater design.
Collar
You can add a mock or turtleneck collar to the sweater by starting your yarn at the shoulder seam, and making a single crochet stitch all the way around, then use your finishing stitch to extend the neckline into a collar by as many rows as it takes to achieve the mock or turtleneck effect you want. Try the sweater on as you go and stop making rows when you are happy with the result.